有些同學在上節課學完transform 模塊之後,便躍躍欲試,其中有一個chop() 方法沒有講,chop 翻譯過來就是砍、剪、裁的意思,有的人就以為這個方法可以實現裁剪工具,但是呢,結果卻事與願違,這是為啥呢?我們這裡嘗試將小蛇從中間裁剪掉50*50像素,看看是什麼樣子。
代碼如下:
-
-
-
from pygame.locals import *
-
-
-
-
size = width, height = 300, 300
-
-
-
clock = pygame.time.Clock()
-
screen = pygame.display.set_mode(size)
-
pygame.display.set_caption("Python Demo")
-
-
oturtle = pygame.image.load("Python.png")
-
-
-
turtle = pygame.transform.chop(oturtle, (100, 105, 50, 50))
-
-
-
position = turtle.get_rect()
-
position.center = width // 2, height // 2
-
-
-
for event in pygame.event.get():
-
-
-
-
-
screen.blit(turtle, position)
-
pygame.draw.rect(screen, (0, 0, 0), position, 1)
-
-
-
-
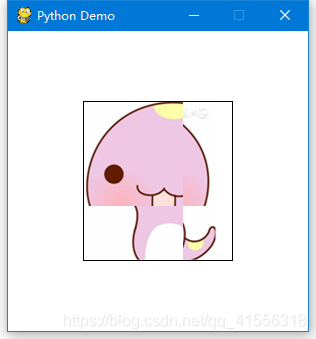
我們首先看看不裁剪是怎樣的:
如果使用chop() 裁剪之後會這樣呢,我們看看:
chop() 之後,面目全非,慘不忍睹。
不知道大家有沒有發現,這個chop() 方法是如何實現的?
其實chop() 方法是把中間50*50 部分不見了,但在中間的位置不是留空(留白),其實將四周所有的元素給擠進去了。也不是我們希望實現的效果。
這一節課我們就來學習如何實現才裁剪工具。
我們先來看一下demo。
-
-
-
from pygame.locals import *
-
-
-
-
size = width, height = 400, 400
-
-
-
clock = pygame.time.Clock()
-
screen = pygame.display.set_mode(size)
-
pygame.display.set_caption("Python Demo")
-
-
turtle = pygame.image.load("Python.png")
-
-
-
-
select_rect = pygame.Rect(0, 0, 0, 0)
-
-
-
-
position = turtle.get_rect()
-
position.center = width // 2, height // 2
-
-
-
for event in pygame.event.get():
-
-
-
-
elif event.type == MOUSEBUTTONDOWN:
-
-
-
if select == 0 and drag == 0:
-
-
-
-
elif select == 2 and drag == 0:
-
capture = screen.subsurface(select_rect).copy()
-
cap_rect = capture.get_rect()
-
-
-
elif select == 2 and drag == 2:
-
-
-
-
elif event.type == MOUSEBUTTONUP:
-
-
-
if select == 1 and drag == 0:
-
-
-
-
if select == 2 and drag == 1:
-
-
-
-
screen.blit(turtle, position)
-
-
-
-
mouse_pos = pygame.mouse.get_pos()
-
-
-
-
select_rect.left, select_rect.top = pos_start
-
select_rect.width, select_rect.height = pos_stop[0] - pos_start[0], pos_stop[1] - pos_start[1]
-
pygame.draw.rect(screen, (0, 0, 0), select_rect,1)
-
-
-
-
-
cap_rect.center = mouse_pos
-
screen.blit(capture, cap_rect)
-
-
-
-
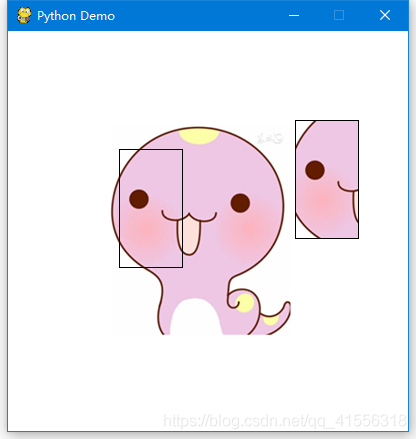
鼠標第一次拖拽時,選中一個矩形的框,第二次拖拽的時候,會把選中的區域裁剪出來,這就是我們希望的裁剪工具,再點鼠標,就恢復原樣。然後就可以進行新一輪的裁剪。
現在對於大家來說,有一點小難度,主要的難度就是在於鼠標每次按下到釋放,就是拖拽的過程,不同次數的按下有不同的意義,大家不妨思考一下,看能不能獨立寫出實現的代碼。
我們來分析一下:
鼠標第一次拖拽左鍵的時候,要裁剪一個範圍;第二次拖拽左鍵的時候,是表示移動裁剪的圖像;第三次點擊的時候就是取消選擇。
所以鼠標要按3中情況來響應它的事件。
首先,第一次拖拽鼠標時的這個黑邊矩形怎麼繪製呢?
我們是調用draw 模塊的rect() 方法,我們接下來會講如何繪製矩形,這個和之前講過的Tkinter繪製圖形是差不多的。
rect ( Surface, color, Rect, width = 0)
第一個參數為Surface,確定是要繪製在哪個Surface 對像上。
第二個參數color 指定邊框的顏色;
第三個參數Rect 指定矩形的範圍;
第四個參數width 指定邊框的大小,默認值為0,表示填充矩形,如果設為1,就表示邊框為1像素的大小。
那既然無法用tranform 模塊的chop() 方法來裁剪,那麼裁剪操作我們該如何處理呢?
我們可以使用subsurface() 方法,就相當於創建surface 的一個子圖像,然後將它copy 出來,即:
capture = screen.subsurface(select_rect).copy()


0 留言:
發佈留言