

《零基礎入門學習Python》第076講:GUI的終極選擇:Tkinter13
這節課我們來學習Tkinter 的佈局管理器,那什麼是佈局管理器呢?說白了,就是用於管理你的組件如何排列。Tkinter 提供了3 大佈局管理器:pack、grid 和place。
- pack 是按添加順序排列組件
- grid 是按行/列形式排列組件
- place 則允許程序員指定組件的大小和位置
(一)pack 管理器
對比grid 管理器,pack 更適用於少量組件的排列,但它在使用上更加簡單(就像我們前邊所有的例子中,展示一個組件我們一般都直接使用.pack(),多簡單~)。如果你需要創建相對複雜的佈局結構,那麼建議是使用多個框架(Frame)結構構成,或者使用grid 管理器實現。
注意:不要在同一個父組件中混合使用pack 和grid,因為Tkinter 會很認真地在那兒計算到底先使用那個佈局管理器......以至於你等了半個小時,Tkinter 還在那兒糾結不出結果!
我們來給大家舉個例子:
我們常常會遇到一個情況就是將一個組件放進另一個組件裡,並且要求是填充另一個組件,那我們要怎麼做呢?
我們先用pack 來演示:
其中,fill 選項是告訴窗口管理器該組件將填充整個分配給它的空間,"both" 表示同時橫向和縱向擴展,"x" 表示橫向,"y" 表示縱向;expand 選項是告訴窗口管理器將父組件的額外空間也填滿。
剛才我們說了,pack 是按照組件的添加順序依次排列的,那麼它依次是縱向排列呢,還是橫向排列呢?我們做一個演示:

我們可以看到,是縱向填充的。如果想要組件橫向挨個兒排放,你可以使用side 選項:

(二)grid 管理器
grid 管理器可以說是Tkinter 這三個佈局管理器中最靈活多變的。如果你只希望學習使用一個佈局管理器,那麼grid 絕對是首選。當你在設計對話框的時候,使用gird 尤其便捷。如果你此前一直在用pack 構造窗口佈局,那麼學習完grid 你會悔恨當初為啥不早學它。使用一個grid 就可以簡單的實現你用很多個框架和pack 搭建起來的效果。
注意:不要在同一個父組件中混合使用pack 和grid,因為Tkinter 會很認真地在那兒計算到底先使用那個佈局管理器......以至於你等了半個小時,Tkinter 還在那兒糾結不出結果!
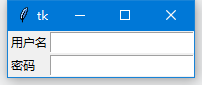
我們還是舉例說明:
使用grid 排列組件,只需告訴它你想要將組件放置的位置(行/列,row 選項指定行,cloumn 選項指定列)。此外,你並不用提前指出網格(grid 分佈給組件的位置稱為網格)的尺寸,因為管理器會自動計算。
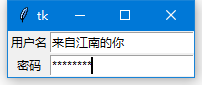
默認情況下組件會居中顯示在對應的網格里,你可以使用sticky 選項來修改這一特性。該選項可以使用的值有"e","w","s","n"(ewsn 分別表示東西南北,即上北下南左西右東)以及它們的組合。因此,我們可以通過sticky = "w" 使得Label 左對齊:
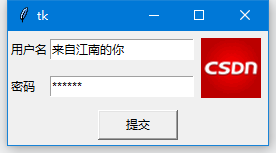
有時候你可能需要用幾個網格來放置一個組件,可以做到嗎?當然可以,你只需要指定rowspan和columnspan就可以實現跨行和跨列的功能:
(二)place 管理器
通常情況下不建議使用place 佈局管理器,因為對比起pack 和grid,place 要做更多的工作。不過存在即合理,place 在一些特殊的情況下可以發揮妙用。請看下邊例子。
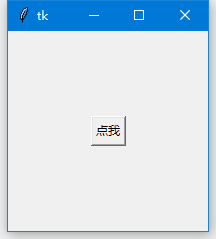
比如我想:將子組件顯示在父組件的正中間:
relx 和rely 就是相對於 父組件的水平位置和垂直位置; anchor="center" 表示居中顯示。
在某種情況下,或許你希望一個組件可以覆蓋另一個組件,那麼place 又可以派上用場了。下邊例子我們演示用Button 覆蓋Label 組件:
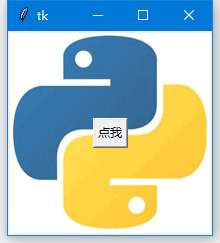
relx 和rely 選項指定的是相對於父組件的位置,範圍是00 ~ 1.0,因此0.5 表示位於正中間。那麼relwidth 和relheight 選項則是指定相對於父組件的尺寸:
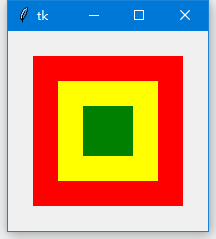
上圖無論你如何拉伸改變窗口,三個Label 的尺寸均會跟著改變(神同步~)。x 和y 選項用於設置偏移(像素),如果同時設置relx(rely)和x(y),那place 將優先計算relx 和rely,然後再實現x 和y 指定的偏移值。
關於這三個佈局管理器的方法和其他選項,可以查看這三個組件的詳解。(有分別介紹這三個組件全部內容的博客,下面是鏈接):


0 留言:
發佈留言