2020年9月12日星期六

70 《零基礎入門學習Python》筆記 第070講:GUI的終極選擇:Tkinter7

《零基礎入門學習Python》第070講:GUI的終極選擇:Tkinter7


上節課我們介紹了Text組件的Indexs 索引和Marks 標記,它們主要是用於定位,Marks 可以看做是特殊的Indexs,但是它們又不是完全相同的,比如在默認情況下,你在Marks指定的位置中插入數據,Marks 的位置會自動發生改變, 因為Marks 認它後面的“那個傢伙”,當Marks 前面的數據被刪除時,Marks 並不會被刪除,它的位置只是相應的向前移動了,只有mark_unset() 方法才能夠刪除Marks,這節課我們接著來介紹Tags 的用法。
Tags(標籤)通常用於改變Text 組件中內容的樣式和功能。你可以修改文本的字體、尺寸和顏色。另外,Tags 還允許你將文本、嵌入的組件和圖片與鍵盤和鼠標等事件相關聯。除了user-defined tags(用戶自定義的Tags),還有一個預定義的特殊Tag:SEL。
SEL(或"sel")用於表示對應的選中內容(如果有的話)。
你可以自定義任意數量的Tags,Tags 的名字是由普通字符串組成,可以是除了空白字符外的任何字符。另外,任何文本內容都支持多個Tags 描述,任何Tag 也可以用於描述多個不同的文本內容。
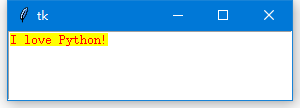
我們來舉個例子:
  1. import tkinter as tk
  2. root = tk.Tk()
  3. text = tk.Text(root, width=40, height=5,)
  4. text.pack()
  5. text.insert("insert", 'I love Python.com')
  6. text.tag_add("tag1", "1.7", "1.13", "1.15")
  7. text.tag_config("tag1", background = "yellow", foreground = "red")
  8. root.mainloop()
還有一點需要注意的是:如果你對同一個範圍內的文本加上多個Tags,並且設置相同的選項,那麼新創建的Tag樣式會覆蓋比較舊的Tag
  1. import tkinter as tk
  2. root = tk.Tk()
  3. text = tk.Text(root, width=40, height=5)
  4. text.pack()
  5. text.insert("insert", 'I love Python.com')
  6. text.tag_add("tag1", "1.7", "1.13", "1.15")
  7. text.tag_add("tag2", "1.7", "1.13", "1.15")
  8. text.tag_config("tag2", foreground = "green")
  9. text.tag_config("tag1", background = "yellow", foreground = "red")
  10. root.mainloop()
那麼新創建的Tag2會覆蓋比較舊的Tag1的相同選項, 注意,與下邊的調用順序沒有關係
你或許想控制Tags 間的優先級,這可以實現嗎?完全沒有問題!你可以使用tag_raise() 和tag_lower() 方法來提高和降低某個Tag 的優先級。
  1. import tkinter as tk
  2. root = tk.Tk()
  3. text = tk.Text(root, width=40, height=5)
  4. text.pack()
  5. text.tag_config("tag1", background="yellow", foreground="red")
  6. text.tag_config("tag2", foreground="green")
  7. text.tag_lower("tag2")
  8. text.insert("insert", "I love Python!", ("tag2", "tag1"))
  9. root.mainloop()
另外Tags 還支持事件綁定,使用的是tag_bind() 的方法。
下邊例子中我們將文本("Python.com")與鼠標事件進行綁定,當鼠標進入該文本段的時候,鼠標樣式切換為"arrow"形態,離開文本段的時候切換回"xterm"形態。當觸發鼠標“左鍵點擊操作”事件的時候,使用默認瀏覽器打開Python的首頁(https://www.python.org/):
  1. import tkinter as tk
  2. import webbrowser
  3. root = tk.Tk()
  4. text = tk.Text(root, width=40, height=5)
  5. text.pack()
  6. text.insert("insert", "I love Python.com!")
  7. text.tag_add("link", "1.7", "1.17")
  8. text.tag_config("link", foreground = "blue", underline = True)
  9. def show_arrow_cursor(event):
  10. text.config(cursor = "arrow")
  11. def show_xterm_cursor(event):
  12. text.config(cursor = "xterm")
  13. def click(event):
  14. webbrowser.open("https://www.python.org/")
  15. text.tag_bind("link", "<Enter>", show_arrow_cursor)
  16. text.tag_bind("link", "<Leave>", show_xterm_cursor)
  17. text.tag_bind("link", "<Button-1>", click)
  18. root.mainloop()
接下來給大家介紹幾個Tags 使用上的技巧:
(一)判斷內容是否發生變化
通過校檢Text 組件中文本的MD5 摘要來判斷內容是否發生改變
  1. import tkinter as tk
  2. import hashlib
  3. root = tk.Tk()
  4. text = tk.Text(root, width=40, height=5)
  5. text.pack()
  6. text.insert("insert", "I love Python.com!")
  7. contents = text.get("1.0", "end")
  8. def getSig(contents):
  9. m = hashlib.md5(contents.encode())
  10. return m.digest()
  11. sig = getSig(contents)
  12. def check():
  13. contents = text.get("1.0", "end")
  14. if sig != getSig(contents):
  15. print("警报:内容发生改变!")
  16. else:
  17. print("风平浪静")
  18. tk.Button(root, text = "检查", command = check).pack()
  19. root.mainloop()
(二)查找操作
使用search() 方法可以搜索Text 組件中的內容。但是傳統的search() 方法只查找到一個,就返回,我們可以加入一個循環,查找所有的。
  1. import tkinter as tk
  2. import hashlib
  3. root = tk.Tk()
  4. text = tk.Text(root, width=40, height=5)
  5. text.pack()
  6. text.insert("insert", "I love Python.com!")
  7. def getIndex(text, index):
  8. return tuple(map(int, str.split(text.index(index), ".")))
  9. start = "1.0"
  10. while True:
  11. pos = text.search("o", start, stopindex = "end")
  12. if not pos:
  13. break
  14. print("找到啦,位置是:", getIndex(text, pos))
  15. start = pos + "+1c"
  16. root.mainloop()
(三)恢復、撤銷操作
Text 組件還支持“恢復”和“撤銷”操作,這使得Text 組件顯得相當高大上。
通過設置undo 選項為True 可以開啟Text 組件的“撤銷”功能。然後用edit_undo() 方法實現“撤銷”操作,用edit_redo() 方法實現“恢復”操作。
  1. import tkinter as tk
  2. import hashlib
  3. root = tk.Tk()
  4. text = tk.Text(root, width=40, height=5, undo = True)
  5. text.pack()
  6. text.insert("insert", "I love Python.com!")
  7. def show():
  8. text.edit_undo()
  9. tk.Button(root, text = "撤销", command = show).pack()
  10. root.mainloop()
 Text 組件內部有一個棧專門用於記錄內容的每次變動,所以每次“撤銷”操作就是一次彈棧操作,“恢復”就是再次壓棧。
默認情況下,每一次完整的操作將會放入棧中。但怎麼樣算是一次完整的操作呢?Tkinter覺得每次焦點切換、用戶按下Enter鍵、刪除\插入操作的轉換等之前的操作算是一次完整的操作。也就是說你連續輸入“I love Python”的話,一次的“撤銷”操作就會將所有的內容刪除。

那我們能不能自定義呢?比如我希望插入一個字符就算一次完整的操作,然後每次點擊“撤銷”就去掉一個字符。

當然可以!做法就是先將autoseparators選項設置為False(因為這個選項是讓Tkinter在認為一次完整的操作結束後自動插入“分隔符”),然後綁定鍵盤事件,每次有輸入就用edit_separator()方法人為地插入一個“分隔符”:
  1. import tkinter as tk
  2. import hashlib
  3. root = tk.Tk()
  4. text = tk.Text(root, width=40, height=5, undo = True, autoseparators = False)
  5. text.pack()
  6. text.insert("insert", "I love Python.com!")
  7. def callback(event):
  8. text.edit_separator() #人为插入分隔符
  9. text.bind('<Key>', callback)
  10. def show():
  11. text.edit_undo()
  12. tk.Button(root, text = "撤销", command = show).pack()
  13. root.mainloop()


0 留言:

發佈留言